­

NOW DAILY UPDATED

How To Get Email Id Of Your All Facebook Friends


Hello To All friends Today i am going to show you how can you get hidden email ids of your all facebook friends. 

Just follow the given steps for do this.


1. If your facebook profile is not connected with yahoo mail then you first create an email id in yahoo and connect your facebook account with yahoo email id.

2. Now You login To Yahoo Mail And Then Go To The Contacts Tab.

3. Now You click on Import Contacts


4. Now Click On Facebook 


5. In Pop up You Will Get Message That Do You Want To Share Your contacts with yahoo. and now click on ok !


6. Now You will Get A Message .


Now You are done :) Click on View Imported Contacts And See You Facebook Friends Email ids .

That's it 

Change your Ip in less then 1 minute

Friends i will show you how to change ip address in less then a minute. For now it will take 2 to 3 minutes but with some practice you can do this within a minute.


  • Click on "Start" in the bottom left corner of the screen.
  • Click on "RUN"
  • Type in "command" and click OK

      You should be now at MSDOS prompt Screen

  • Type "ipconfig /releasejust like that, and press "enter"
  • Type "exit" and leave the prompt
  • Right-click on "Network Places" or "My Network Places" on your desktop.
  • Click on "properties"

     Now you should  be on a screen with something titled "Local AreaConnection", or something  similar to that, and, if you have a network hooked up, all of your other networks.

  •  Right click on "Local Area Connection" and click "properties"
  • Double-click on the "Internet Protocol (TCP/IP)" from the list under the "General" tab
  • Click on "Use the following IP address" under the "General" tab
  • Create an IP address (It doesn't matter what it is)
  • Press "Tab" and it should automatically fill in the "Subnet Mask" section with default numbers.
  • Press the "Ok" button here
  • Hit the "Ok" button again

     Now you should be back to the "Local Area Connection" screen.

  • Right-click back on "Local Area Connection" and go to properties again.
  • Go back to the "TCP/IP" settings
  • This time, select "Obtain an IP address automatically"
  • Click on "Ok"
  • Hit "Ok" again.
  • Now you have a New IP address.

How To Place Facebook Chat On Firefox Sidebar


Get your best score on USMLE Step 1 Strategy Based Preparation
facebook chat
Facebook Chat is cool, at least it allows you to send instant messages to online Facebook contacts. However I’m not really a fan of the chat bar being at the bottom of the page, what if I’ve left Facebook but still wants to remain chatting with my Facebook contacts? If you are using Firefox, you can place the Facebook Chat at the sidebar.

Step 1

Look for Bookmarks on the top navigation. Select Organize Bookmarks…
facebook chat

Step 2

Click New Bookmark... tab and enter the following:
  • Name: Facebook Chat
  • Location: http://www.facebook.com/presence/popout.php
  • Check Load this bookmark in sidebar.
fchat02.jpg

Step 3

Launch the Firefox sidebar, click Facebook Chat and start chatting with your Facebook contacts within Firefox.
fchat03.jpg
Thats It..
:)

GEt 100 Free Facebook Fan Page Likes

Whats up everyone,
I can Give you 100
facebook fan page likes

I got a coupon worth about $8

1 http://socialmediaexplode.com

2. Create an Account

3. on the side menu you will see

COUPOUN
click that and enter

4218-8079-5149-9199

Now you have 50,000 coins this is the
sites currency.

4 You now need to click add site.
on this
page you will select facebook fan page
likes and enter your fan page url.

next
you need to set your CPC Coins per
click. set it to 500 as this will get you
likes the fastest.

And thats it you will now get 100 likes
FREE

REP + For more Coupons
O
Also it only works for the first 10,000
members so use it as soon as possible

If any problem u got comment below happy to help u

If u like Plzz hit thanxx

How to Add a Menu Bar in Blogger

Here are the steps to add a menu bar in Blogger:

  1.  In the Blogger dashboard, go to Layout


  2.  Click on Add a Gadget


  3.  Select HTML/JavaScript


 4.  Under Content, paste the following code

  <div id='menubar'>
    <ul id='menus'>
      <li>
        <a href='#'>MenuItem</a>
      </li>
      <li>
        <a href='#'>MenuItem</a>
      </li>
      <li>
        <a href='#'>MenuItem</a>
      </li>
    </ul>
  </div>

  5.  Replace MenuItem with the appropriate menu label
  6.  Replace # with the appropriate URL
  7.  Save your changes


The following video demonstrates how to add a menu bar in Blogger:

Facebook Offers Free Antivirus for PC & Mobile Phone Users


Viruses and Spywares programs can be used to attack our computers, so it is necessary for every computer users to guard their PC against dangerous programs like viruses and malwares by installing an Antivirus program on their PC.
Facebook-Free-Antivirus-for-PC-and-Phones

You need to pay money to some antivirus program developers before you would be able to use their software on your PC, but luckily, Facebook is providing its users with some antivirus programs that requires users to pay some certain amount of money for FREE. All Facebook users are entitled to this offer and these antivirus programs are for Windows, Mac and mobile phones.

To get any of the antivirus programs on either your PC or Mobile Phones, just follow the steps out lined below.

Facebook Free Antivirus Programs Available for Windows

• Panda Security 2013 
• mcafee internet security 
• avira free antivirus 
• WOT 
• Kaspersky total security 
• microsoft essentials security 
• Avg Antivirus Free 2013 
• Norton Antivirus 
• Avast Free Antivirus 
• Trend Micro Titanium Internet security 2013

Facebook Free Antivirus Programs Available for MAC

• New kaspersky security for mac
• Trend Micro Titanium Internet security 2013
• Avast Free Antivirus
• Sophos antivirus
• Avira Free security
• Norton Antivirus

Facebook Free Antivirus Programs Available for Mobile Phone

• Mcafee Mobile security
• Norton Mobile Security lite for Android

Steps to Get Any of The Facebook Free Antivirus

1. Visit https://www.facebook.com/security/app_360406100715618 .
2. When the page opens, select the Antivirus of your choice and the click on ‘learn more’
3. Now click on Facebook Like button to like the Facebook security page and corresponding antivirus page.
4. Finally, the download button will be visible for you to download.

Note that some of the antivirus programs provided by Facebook only have 6 months serials, you need to read the details of each software very well before you proceed to downloading it.

List of Phones that are Compatible with WhatsApp Messenger


Sometimes ago, a friend of mine told me Nokia phones could ping BlackBerry, then I was confused that how could this be possible, moreover will I take my Nokia phone to RIM to install a hardware/software on my phone? Has RIM acquired Nokia or are they now partners? And many more questions runs through my head. But the application I was told that is capable of pinging then was WhatsApp, I then proceeded to research the application, how it works and what is capable of doing. During my research I was able to conclude that WhatsApp couldn’t ping BlackBerry as I thought, but if WhatsApp application is installed on a BlackBerry then both users could chat and the application is an alternative to BlackBerry Messenger for those that doesn’t possess one.
Phones-That-Are-Compatible-With-WhatsApp-Messenger

What is WhatsApp Messenger?

WhatsApp Messenger is a smartphone messenger available for iOS,[8] BlackBerry OS,[9] Android,[10] Symbian, Series 40, and Windows Phone. WhatsApp uses your 3G or WiFi (when available) to message with friends and family. In addition to text messaging, users can send each other images, video and audio media messages. According to Financial Times, WhatsApp "has done to SMS on mobile phones what Skype did to international calling on landlines.

The main purpose of this post is to share the list of hand held devices that are compatible with WhatsApp messenger so that you don’t waste your time searching the internet may be you could find a compatible one for your incompatible device.

Note That: WhatsApp is free to download and try for the first year for all of the phone types except for iPhone. For iPhone users there is only a one-time charge when you first download the app. Other users have the option of subscribing to an additional year of service for $0.99 USD.

WhatsApp Messenger Supported Nokia S60 and Symbian phones:

Nokia 500Nokia E6
Nokia 5228
Nokia 5230
Nokia E63
Nokia 5233Nokia E66
Nokia 5235
Nokia 5250 
Nokia E7
Nokia 5320Nokia E71
Nokia 5530Nokia E72
Nokia 5630Nokia E73
Nokia 5700Nokia E75
Nokia 5730Nokia E90 Communicator
Nokia 5800Nokia N76
Nokia 600Nokia N78
Nokia 603Nokia N79
Nokia 6110Nokia N8
Nokia 6120Nokia N81
Nokia 6121Nokia N81 8 GB
Nokia 6124Nokia N82
Nokia 6210Nokia N85
Nokia 6220Nokia N86 8 MP
Nokia 6290Nokia N95
Nokia 6650 FoldNokia N95 8 GB
Nokia 6700
Nokia 6710 Navigator
Nokia N96
Nokia 6720Nokia N97
Nokia 6730Nokia N97 mini
Nokia 6760 SlideNokia X5-01
Nokia 6790 SurgeNokia X6
Nokia 700Nokia X7
Nokia 701Samsung GT-i8510
Nokia 808 PureView  Samsung GT-l7110
Nokia C5Samsung i8910 Omnia HD
Nokia C5-03Samsung SGH-G810
Nokia C6Samsung SGH-iNNN
Nokia C7Samsung SGH-L870
Nokia E5Sony Ericsson Satio
Nokia E51Sony Ericsson Vivaz
Nokia E52Sony Ericsson Vivaz Pro
Nokia E55

WhatsApp Messenger Supported Nokia S40 series phones:

Nokia Asha 201
Nokia Asha 300
Nokia Asha 302
Nokia Asha 303
Nokia Asha 306
Nokia Asha 311 
Nokia C3-00
Nokia C3-01
Nokia X2-00
Nokia X2-01
Nokia X3-02

WhatsApp Messenger for BlackBerry phones:

WhatsApp Messenger support any BlackBerry device that meets the following requirements:
  1. The BlackBerry is running OS 4.6 or newer
  2. The BlackBerry is subscribed to a full BIS data plan.

WhatsApp Messenger for Android:

WhatsApp Messenger support all Android phones provided they meet the following requirements:
  1. Your Android phone is running Android OS 2.1 or later. 
  2. Your Android phone is able to receive SMS or calls during the verification process.

You will also need an adequate data plan in order to receive messages when outside the range of a Wi-Fi network.


WhatsApp Messenger for Apple Devices:

WhatsApp Messenger do not support tablets or Wi-Fi only devices at this time

WhatsApp for iPhone requires iOS 4.3 or later. For the best experience, we recommend you use the latest version of iOS available for your phone. Please read this Apple Support articleto learn how to update your iPhone's software.
Please note: iPod and iPad devices are not supported at this time.

We do not explicitly restrict the use of jailbroken or unlocked devices, but because these modifications may affect the functionality of your device, we cannot provide support for devices using modified versions of the iPhone's operating system.

WhatsApp Messenger for Windows Phones:

Requirements to use WhatsApp on a Windows Phone are the following:
  1. Windows Phone 7.5 or later.
  2. An active internet connection.

[Credit]

Enjoy your chatting moments on WhatsApp Messenger!

Please Comment Below. Your comments Will be appreciated :)

Create Automatic Tabs Menu From Labels Widget


automatic tabs menuYes you heard it right! Thankfully now you can create a tabs menu using blogger's official labels widget. Tab links will be automatically updated and added to your menu whenever you create a new tag/category. This widget is really helpful for those of our readers who wanted an automatic method rather the traditional techy way of drop down menus. I have tried my best to make it worth looking and worth trying. This is again a first time shared post by MBT on automatic Tabs Menu for blogger blogs. Lets see a demo first,

How To create the Navigation Menu?

  1. Go To Blogger > Design > Edit HTML
  2. Backup your template
  3. Search for this code,
]]></b:skin>
    4.   Just above it paste the following CSS code,
/* MBT Automatic Tabs Menu */


.mbt-label-list h2 {
    display: none;
}
.mbt-label-list a {
    color: #333333;
}
.mbt-label-list {
    background: #E1D4C1;
    height: 35px;
border:1px solid #DBC8AD;
-moz-border-radius:6px;
-webkit-border-radius:6px;
box-shadow: 5px 5px 5px #CCCCCC;
    margin: 0 auto;
    padding:0px;
    text-shadow: 0 1px 0 #E1D4C1;
    text-transform: none;
    width: 960px;
}
.mbt-label-list li {
    border-right: 1px solid #666;
    color: #333333;
    float: left;
    font: bold 12px Arial;
    margin: 0 2px 5px 0;
    padding: 0px 14px;
    text-transform: uppercase;
}
.mbt-label-list ul {
    float: left;
    list-style: none outside none;
    margin-bottom: 0;
    margin-left: 10px;
 
    padding: 0;
    width: 920px;
}
This CSS code is responsible for the color and look of your tab links and background.
  • If you wish to change the background color of the menu then edit    #E1D4C1
  • To change link colors change this #333333 . Edit it twice.
5.   Now search for this code,
<div id='content-wrapper'>
If you are using the new blogger designer template then search for this code instead,
<div class='tabs-outer'>
   6.  Just above any of these matching codes paste the following HTML code,
<div class='mbt-label-list'> <b:section class='mbt-label-list' id='mbt-label-list' preferred='yes' showaddelement='no'>
<b:widget id='Label1' locked='true' title='Labels' type='Label'/>
</b:section></div>
<div class='clear'>&#160;</div>
This code will create a labels widget in your PageElements page.
   7.   Save your widget and you are all done!
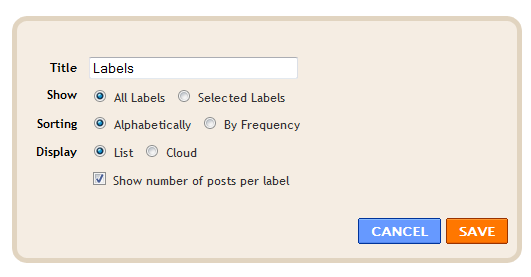
Visit your page elements page and open the label widget at top,
labels widget
Choose the following settings:
  1. Choose All labels only if your number of labels are less than 10. Else chooseselected labels to decide which label links you wish to display in tabs.
  2. Set sorting to alphabetically or by frequency which ever you like. Choosing by frequency will display your most used label tabs first in the menu and the least used labels last in the menu.
  3. Choose Display as list
  4. You can decide whether to show or hide the label counts. So  uncheck "Show number of posts per label" if you don't want label count to be displayed next to each tab.
  5. Hit save and bingo you are all set!
tabs menu settings
Visit your blogs to see this brilliant new trick working Just Perfectly.

Create Automatic Menu From Blogger Pages


Create Pages

For this menu to work you will first need to create pages if you have not created one as yet. You will need to create two pages. One for your contact form and another for your About info. Give the pages any title you like but About and Contact is recommended.
  1. Go To Blogger > Edit Posts > Edit Pages
  2. Click Create New Page
  3. Now give your page a title and add some info inside it.
  4. Publish it.
  5. Done!
  6. Repeat this process twice for creating two pages.

Add Pages To Menu

Now we need to create a tabs menu that will display all page links at the top of your blog just above header. To do this follow these simple steps:
  1. Go to Blogger > Design > Edit HTML
  2. Backup your template
  3. Search for this,

]]></b:skin>

    4.   Paste the following code just above it,
/*-----MBT Page Menu-----*/
#PageList1 {
background:#333;
height: 41px;
margin: 3px auto;
padding: 0;
width: 100%;
}
.PageList1 ul {
    float: left;
    list-style: none;
    margin: 0;
    padding: 0;
}
.PageList li a {
color: #FFFFFF;
font: bold 12px arial;
padding: 12px 14px;
text-shadow: 0 1px 0 #000000;
text-transform: none;
}
.crosscol .PageList li, .footer .PageList li {
background: none repeat scroll 0 0 transparent;
float: left;
list-style: none outside none;
margin: 0;
padding: 12px 0;
}
.PageList li.selected a {
background: none repeat scroll 0 0 #000000;
color: #FFFFFF;
font-weight: bold;
text-decoration: none;
}
.PageList li a:hover {
background: none repeat scroll 0 0 #000000;
color: #FFFFFF;
font-weight: bold;
text-decoration: none;
}


    5.    Next search for this code,

<div id='header-wrapper'> 

    6.    Just above it paste the following code,

<div id='crosscol-wrapper' style='text-align:center'>
        <b:section class='crosscol' id='crosscol1'>
<b:widget id='PageList1' locked='false' title='Pages' type='PageList'/>
</b:section> </div>

     7.   Save your template
     8.    You are all done!
Visit your blogs to see this amazing new automatic Tabs Navigation menu just at the top of your blog.

How to Block/Disable Photo Tags on Facebook


Have you ever check your Facebook timeline as see some silly pictures you were tagged in? I really hate that, because it is embracing to see senseless & silly pictures on my Facebook timeline and I know most people hate it. Though there is no way to block friends from tagging you, but you can stop the pictures from appearing on your timeline without your permission and the best way to do that is to edit your Facebook privacy settings by approving tags before they appear on your profile.

How-To-Disable-Photo-Tags-on-Facebook

Steps to Block Facebook Photo Tag

1. Login to your Facebook account from your computer and clickhttp://www.facebook.com/settings/?tab=privacy

2. Then click the Edit Settings link as shown in the shot below:


3. After clicking on the edit settings link, a new page will pop up then click on Review posts friends tag you in before they appear on your timeline.


4. A new page will pop up again, so select Enable from the drop down to enable feature then click the Back button. See screen shot below:


5. Finally, save your settings. So anytime you’re tagged you will be asked to review it i.e. to reject it or approve it.

By now, there will be no more illicit photo tag on your Facebook timeline.

Our free services:

Get our toolbar!

Related Posts Plugin for WordPress, Blogger...


Contributors

Total Pageviews

Please Visit This Add

Followers

Copyright @ CODEXTRA PVT. LTD. Powered by Blogger.