­

NOW DAILY UPDATED

How To Print From Android Devices | Tablet or Phone


Long time ago, mobile phones devices were just used as tools to manage our work and business, with other petty facilities to enjoy it a bit. But now, hand held devices like iPhone or Android have grown invaluably with the heap of features imbedded in them.
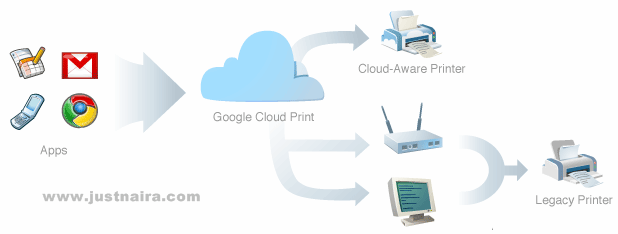
Print From Android Through Cloud

Would you like the ability to print your notes or email as soon as you read them? Well, the technology to make that happen now exists on Android and some other mobile platform. But this post will focus on how to print data like images or emails on your Android device wherever you are, at anytime, at anywhere. 

Google Cloud Print is the awesome tool, which enables Android OS users to easily print from their mobile devices. For those who don’t really know the meaning of Google Cloud Print, the Google Account users need to associate their printers with the Google account via this service after which with the help of cloud technology the documents can be printed from your Google account via the assigned printers.

It allows users to print anything from their Android devices, to any cloud-connected printer. Since the file(s) you want to print is/are securely sent to your printer over the web, you don’t need to care whether your printer is at home, or work. You can even print when you are in another continent. You don’t need any complex network setups to start printing on your device. Google Cloud Print comes with the support of printing the files which comes with the formats: pdf, jpg, jpeg, docx, ods, xls, xlsx, ppt and odp.

Some main features of Google Cloud Print are:
- Share printers with friends
- mail printing
- sms printing
- print job management
- internal file browser
- webpage printing
- printer managment ( Printer options )
- Print from clipboard

How to Print on Your Android Using Google Cloud Print

To get started, you need a Google account to use Google Cloud Print. A gmail account will do the work, so you don’t have to worry because you already have one.

You will also need a Google Chrome browser on your PC, before you can connect a printer on your PC to Google Cloud Print. Google Cloud Print connector also needs to be activated in Chrome.

1. Connect your printer to your PC.
2. Click the wrench icon in the upper right hand corner of Google Chrome and then choose “Options”.
3. Click the "Under the Hood" tab. Scroll to the bottom to the Google Cloud Print section and click "Sign in to Google Cloud Print."
4. In the dialog that appears, sign in to your Google Account to enable Google Cloud Print.
5. When you have signed in, you will see a confirmation page

To verify you have successfully connected your printer, print out a test page.

To print from your Android phones and tablets, you can use the built-in Cloud printing features available in Gmail or Google Docs. Alternatively, you can download the Google Cloud Print App to your device from here.

Conclusively, if you only print on rare occasions, you could also consider going through the manual route. All you just do is sync your Android phone or tablet with your PC, copy the data you want to print on your PC, and then print from there. Alternatively, you could email the file to yourself, and then print it from your computer.

Got any option or idea that works? It is welcome. Share it via the comment.

Posted By:-
Wamiq Mirza :)

How to Print Directly from BlackBerry® SmartPhones


Hello Readers.. Here is a post with detailed information on how BlackBerry® users can print from their devices as well.
Print Directly From BlackBerry

The BlackBerry smartphones does not offer a native printing function, but with the help of developers, BlackBerry users can print from their devices without much hassle. The application that does the job is called Remote Print. This app is not the only BlackBerry app that enables printing, it’s just that it has been tested and proved to be working correctly.

Remote Print for BlackBerry isn’t free, it cost $4.99. The application is available on BlackBerry App World. This app can print any file from your BlackBerry device including emails, photos, excel, word, PDF, memos, address contacts, all office documents and more.

Install Remote Print on your BlackBerry and the companion PC Suite on your computer. Select the document you want to print from your BlackBerry and send it to your computer or print it directly. Remote Print will connect to the host computer, which will in turn connect to the printer to print the files.

Bonus: Alternative to Remote Print

Cortado Basic Print is another app that enables printing from your BlackBerry device, it works with Bluetooth printer. This app too isn’t free, but it has a no-cost trial period during which you can evaluate the full versions.

Download and set up Cortado on your BlackBerry. Connect to any Bluetooth-enabled printer, or use a Bluetooth adapter if the printer does not have Bluetooth capability. Select the document you want to print and send it directly to the printer using the application. Choosing this solution will require a monthly service fee. Cortado will add a Print button to your BlackBerry device file menu after installation. 

How to send friend request when your friend req is BLOCKED

How to send friend request on
Facebook when blocked?
You might have gone through this
stage in your Facebook account maybe
at least once, i.e. your friendship
request being blocked for 1 day,3days
or even 1month,i have also gone
through this stage & it feels like
helpless,that we want to send the
friend request to our most dear ones
but we can’t because of this friend
request block.


Here’s what you’ll be needing:


1. Firefox (FF)


2. The FF extension named “Tamper
Data“. (Install it, and then restart FF).
Once the Tamper Data extension is
installed, you’ll find it’s menu item
under the “Tools” menu in FF. Click it
when mentioned below to open it’s
window.


So let’s start, simply follow the steps..
The title of the dialog box says “This
Request Can’t Be sent”, and “Do you
know this user personally?”. We want
to go around this …


Facebook has gotten a little smart and
when you click the “Add as friend”
button on the target’s profile, you may
see the top screen again.


1.You’ll need to get to the “Send
request” screen.


The trick here is to just keep clicking
the “Add Friend” button, and closing
the “Do you know this user personally”
dialog box over and over until the
“Send Request” screen finally pops
up.It may be the second time, it may
be the 50th time, but it’ll eventually
pop up.


2. When it does, go to the “Tools”
menu in Firefox and click the “Tamper
Data” menu item near or at the bottom
of the list.


3. Then click the “Start Tamper” menu
item


4. And then finally try again to send the
friendship request


5. This would open a pop-up window
asking to continue tampering,click on
tamper


Once you’v
e clicked the Send Request
button with Tamper Data started, the
above screen will show, make sure that
the URL shown looks like the above
one, so you’re “adjusting” the correct
data. Then Click the “Tamper” button.
You’ll come to the above screen next.
Follow the instructions as shown and
click the OK button. If or when any
other “Tamper with request” screens
popup while you’re in the middle of
editing the above data, just click the
“Abort request” button on it to get it
out of your way.


Once you click the OK button on the
edit screen you’ll see the above popup
dialog, just click the OK button. This
needs to be done to keep all data
proper before it’s sent.


Once you OK the Content Length
dialog, you should see the above
screen, as if you were never blocked
from sending the Facebook friend
request. If you get the original “this
request can’t be sent” screen again,
just do all of the steps over again. You
may have to do it a few times until it
works. Eventually it will.

Our free services:

Get our toolbar!

Related Posts Plugin for WordPress, Blogger...


Contributors

Total Pageviews

Please Visit This Add

Followers

Copyright @ CODEXTRA PVT. LTD. Powered by Blogger.