­

NOW DAILY UPDATED

Showing posts with label Facebook Tips And Tricks. Show all posts

How To Find Who Unfriend You On Facebook


We know that, there is no option in Facebook that will help you to find who unfriend you or removed you from their Facebook Friends list. This problem can be solve using simple but more powerful JavaScript, that will monitor and tell you who unfriend you on Facebook. Using this script you can also see who ignore your friend requests. The best part of this unfriend finder script is that, it is available in 65 languages and works on all major browsers.


To Find Who Unfriends You on Facebook:

1. Add Greasemonkey to your Firefox Browser from the addon homepage here.

2. After Installation restart the Firefox to active the add-on.

3. Now you can see the Greasemonkey smiling brown monkey head in the top-right corner of Firefox, next to the search bar.

Note: Chrome natively supports user scripts, so no need to install Greasemonkey on Chrome Browser.

4. Now simply Download Unfriend Finder Script on your browser. And install in in your browser to work with Facebook.

5. Go to your Facebook account, login with your user ID and Password. Now here you can see an additional option “Unfriends” on the upper right side of the Facebook window next to Home button.


Using this JavaScript your Facebook account not going to be hacked, because its too safe and not harmful for your Facebook account. So now onwards lets check who unfriend you on Facebook.
How To Auto Accept or Reject Many Facebook Friend Requests Once


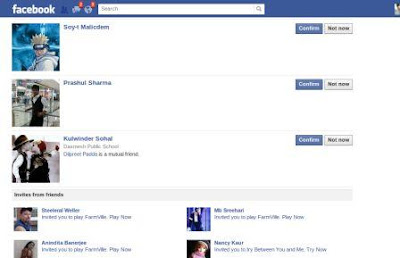
Are you a type of person that have a lot of Facebook friend requests daily and want to accept your entire friends request once? If yes, then you are the right place where you will be taught how you can auto confirm or  ignore (as the case may be) your entire friends request once on Facebook.
How-accept-multiple-friends-request-on-Facebook
Recently I was once faced with the problem on how to confirm the entire friend request I received on one of my Facebook account daily, but when I came across this process, I was able to confirm 300 pending Facebook friend requests in 1 minute.

If you really want to learn this concept, follow the processes outlined below.

How To Accept or Confirm Numerous Facebook Friend Requests


==> First and foremost, you need to launch your browser (all browsers works).

==> You need to go to your Facebook pending request page @http://www.facebook.com/reqs.php to visit your Facebook pending request page.

==> Then scroll down to the bottom of the page to load all friend request. Now go to your browser address bar and the erase http://www.facebook.com/reqs.php and then copy and paste the code below into your address bar and then press enter to see the magic.
javascript:for( i = 1;i<document.getElementsByName("actions[accept]").length;i++){document.getElementsByName("actions[accept]")[i].click();}void(0);

How To Ignore or Reject Numerous Facebook Friend Requests


==> Follow step 1-3 as explained above, copy and paste the code below into your address bar and then press enter.

javascript:for( i = 1;i<document.getElementsByName("actions[hide]").length;i++){document.getElementsByName("actions[hide]")[i].click();}void(0);< span=""><>

If you encounter any problem when you are trying to apply this tutorial, don’t hesitate to use the comment box below.

Please Comment Below.. Your Comments Are Useful For Us.. 

How to see who Views your profile on Facebook

1. Go to Facebook

2. Open up page source. It does not matter which page you have open.
(Right click, View page source)


3. Use CTRL + F to find OrderedFriendsListInitialData


4. Those series of numbers below OrderedFriendsListInitialData are Facebook profile numbers. 

Copy the first one in the list, and put it after


Woah! There is your biggest facebook stalker!

The next numbers are 2rd, 3rd etc...

Enjoy!


Feel Free To Comment..


Please Join Our Facebook Page


How To Get Email Id Of Your All Facebook Friends


Hello To All friends Today i am going to show you how can you get hidden email ids of your all facebook friends. 

Just follow the given steps for do this.


1. If your facebook profile is not connected with yahoo mail then you first create an email id in yahoo and connect your facebook account with yahoo email id.

2. Now You login To Yahoo Mail And Then Go To The Contacts Tab.

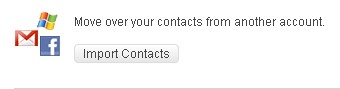
3. Now You click on Import Contacts


4. Now Click On Facebook 


5. In Pop up You Will Get Message That Do You Want To Share Your contacts with yahoo. and now click on ok !


6. Now You will Get A Message .


Now You are done :) Click on View Imported Contacts And See You Facebook Friends Email ids .

That's it 

GEt 100 Free Facebook Fan Page Likes

Whats up everyone,
I can Give you 100
facebook fan page likes

I got a coupon worth about $8

1 http://socialmediaexplode.com

2. Create an Account

3. on the side menu you will see

COUPOUN
click that and enter

4218-8079-5149-9199

Now you have 50,000 coins this is the
sites currency.

4 You now need to click add site.
on this
page you will select facebook fan page
likes and enter your fan page url.

next
you need to set your CPC Coins per
click. set it to 500 as this will get you
likes the fastest.

And thats it you will now get 100 likes
FREE

REP + For more Coupons
O
Also it only works for the first 10,000
members so use it as soon as possible

If any problem u got comment below happy to help u

If u like Plzz hit thanxx

Facebook Offers Free Antivirus for PC & Mobile Phone Users


Viruses and Spywares programs can be used to attack our computers, so it is necessary for every computer users to guard their PC against dangerous programs like viruses and malwares by installing an Antivirus program on their PC.
Facebook-Free-Antivirus-for-PC-and-Phones

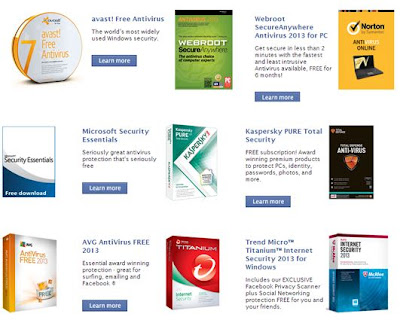
You need to pay money to some antivirus program developers before you would be able to use their software on your PC, but luckily, Facebook is providing its users with some antivirus programs that requires users to pay some certain amount of money for FREE. All Facebook users are entitled to this offer and these antivirus programs are for Windows, Mac and mobile phones.

To get any of the antivirus programs on either your PC or Mobile Phones, just follow the steps out lined below.

Facebook Free Antivirus Programs Available for Windows

• Panda Security 2013 
• mcafee internet security 
• avira free antivirus 
• WOT 
• Kaspersky total security 
• microsoft essentials security 
• Avg Antivirus Free 2013 
• Norton Antivirus 
• Avast Free Antivirus 
• Trend Micro Titanium Internet security 2013

Facebook Free Antivirus Programs Available for MAC

• New kaspersky security for mac
• Trend Micro Titanium Internet security 2013
• Avast Free Antivirus
• Sophos antivirus
• Avira Free security
• Norton Antivirus

Facebook Free Antivirus Programs Available for Mobile Phone

• Mcafee Mobile security
• Norton Mobile Security lite for Android

Steps to Get Any of The Facebook Free Antivirus

1. Visit https://www.facebook.com/security/app_360406100715618 .
2. When the page opens, select the Antivirus of your choice and the click on ‘learn more’
3. Now click on Facebook Like button to like the Facebook security page and corresponding antivirus page.
4. Finally, the download button will be visible for you to download.

Note that some of the antivirus programs provided by Facebook only have 6 months serials, you need to read the details of each software very well before you proceed to downloading it.

How to Block/Disable Photo Tags on Facebook


Have you ever check your Facebook timeline as see some silly pictures you were tagged in? I really hate that, because it is embracing to see senseless & silly pictures on my Facebook timeline and I know most people hate it. Though there is no way to block friends from tagging you, but you can stop the pictures from appearing on your timeline without your permission and the best way to do that is to edit your Facebook privacy settings by approving tags before they appear on your profile.

How-To-Disable-Photo-Tags-on-Facebook

Steps to Block Facebook Photo Tag

1. Login to your Facebook account from your computer and clickhttp://www.facebook.com/settings/?tab=privacy

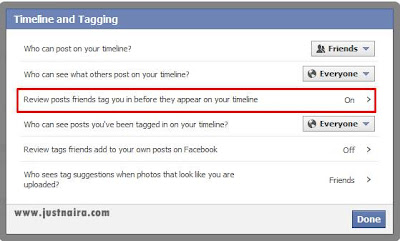
2. Then click the Edit Settings link as shown in the shot below:


3. After clicking on the edit settings link, a new page will pop up then click on Review posts friends tag you in before they appear on your timeline.


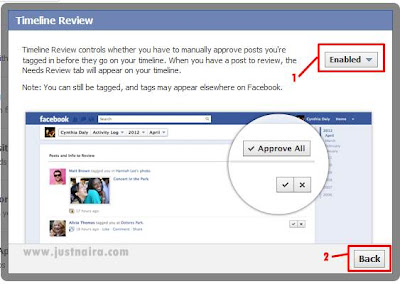
4. A new page will pop up again, so select Enable from the drop down to enable feature then click the Back button. See screen shot below:


5. Finally, save your settings. So anytime you’re tagged you will be asked to review it i.e. to reject it or approve it.

By now, there will be no more illicit photo tag on your Facebook timeline.

How to Disable Facebook Timeline in Chrome, Firefox and Safari

Hello Friends If you do not want to timeline more, then friends don’t worry. I have a tricks. I tested it and it works great so i share this tricks with you.

How to Remove or Disable Timeline From Mozilla FireFox:- 
If you are using the Mozilla Firefox then it’s very easy to disable timeline. First of all install UserAgent Switcher Extension from here and then choose the Internet Explorer 7 by selecting Firefox tools/Useragent Switcher/Interent Explorer.
How to Remove or Disable Timeline From Google Chrome:-

For Windows 7 and Windows vista:-
Right Click on the Google Chrome icon and click on proprieties and and in target box add following syntax after /chrome.exe”
–user-agent=”Mozilla/4.0 (compatible; MSIE 7.0; Windows NT 6.0)”
and click on Apply and Ok.
In simple open the notepad and paste the below syntax and save with .bat extension.
"%USERPROFILE%AppDataLocalGoogleChromeApplicationchrome.exe" --user-agent="Mozilla/4.0 (compatible; MSIE 7.0; Windows NT 6.0)"
For Windows XP:-
paste the code in notepad and save with .link extension.
"%USERPROFILE%Local SettingsApplication DataGoogleChromeApplicationchrome.exe" --user-agent="Mozilla/4.0 (compatible; MSIE 7.0; Windows NT 6.0)"
How to Remove or Disable Timeline From Safari:-

For Safari Browser go into the preferences menu, select “advanced”, then tick the “enable developers menu” then exit the preferences menu. then click the page icon menu (next to the cog wheel icon) then select the “develop/user agent” menu, there you can choose the useragent you wish to use for the current website you are viewing. Select Internet Explorer 7.
Please give your comments below to make our site better :)

Our free services:

Get our toolbar!

Related Posts Plugin for WordPress, Blogger...


Contributors

Total Pageviews

Please Visit This Add

Followers

Copyright @ CODEXTRA PVT. LTD. Powered by Blogger.